


Plate Carrier Setup: The Complete Guide to Fit, Load, and Real-World Use
How to fit, load, and wear a plate carrier the right way. Sizing, plate position, cummerbund tension, MOLLE layout, and the setup mistakes we see every week from over a decade of building carriers in Knoxville, Tennessee.
There is a difference between owning a plate carrier and knowing how to wear one. We see this difference every week. A customer shows up with a $400 carrier that is set up wrong in four different places, and they are wondering why their shoulders hurt after twenty minutes of wear. The carrier is fine. The setup is killing them.
We are a family-owned shop that has been designing and manufacturing plate carriers in Knoxville, Tennessee for over a decade, and the honest truth is this: the carrier matters less than you think, and the setup matters more than you think. A mediocre carrier set up correctly will outperform a premium carrier set up wrong, every time. Coverage, mobility, and endurance are not features you buy. They come from how you fit, load, and wear the gear.
This guide walks through the full setup process. Sizing, plate positioning, shoulder strap and cummerbund tension, MOLLE layout strategy, accessory priority, mission-specific configurations, break-in period, and the common mistakes we see. It is written as a builder, not as a sales pitch. If you are setting up your first carrier, this is the step-by-step. If you already think you have your carrier dialed, read the Common Setup Mistakes section first. You might be surprised.
Why Setup Matters More Than the Carrier
Three things a bad setup breaks. Once you see them, you cannot unsee them.
Coverage. Armor in the wrong position does not cover the organs it is supposed to protect. A plate sitting two inches too low exposes the upper chest and the great vessels above the heart. The plate is still in the carrier. It is still rated to stop what it is rated to stop. But it is not where it needs to be, so it is not protecting what it needs to protect. This is the most dangerous setup mistake because it is silent. You cannot feel that your plate is in the wrong place. You have to know where it should be and check.
Mobility. Load placed wrong snags, restricts movement, and throws off your balance. A cummerbund that is too loose lets the carrier rotate when you twist. A front panel loaded heavy with no counterweight on the back pulls you forward. A mag pouch placed on the wrong side requires a cross-draw that costs you half a second every time. Individually these sound minor. Stacked together, they are the difference between gear that works and gear that fights you.
Endurance. Poor load distribution multiplies fatigue. A carrier that sits on your shoulders instead of riding on your torso transfers all the weight into your trapezius muscles. Twenty pounds of gear on well-distributed shoulder straps feels like twenty pounds. Twenty pounds on a single pressure point feels like forty after an hour. Most people who say “plate carriers are uncomfortable” are describing a setup problem, not a carrier problem.
Get the setup right and the carrier disappears. You stop thinking about it. That is the goal.
\r\n\r\n\r\n\r\nThat said, a good carrier makes good setup easier. The two we build and recommend most: the Leap Plate Carrier Base, a lightweight adaptable platform that runs slick or scales up, and the AMP Plate Carrier, a precision laser-cut full-feature carrier with a retention elastic cummerbund. Both are built from USA materials and set up cleanly using the steps below. New to choosing a carrier? Start with our complete plate carriers guide.
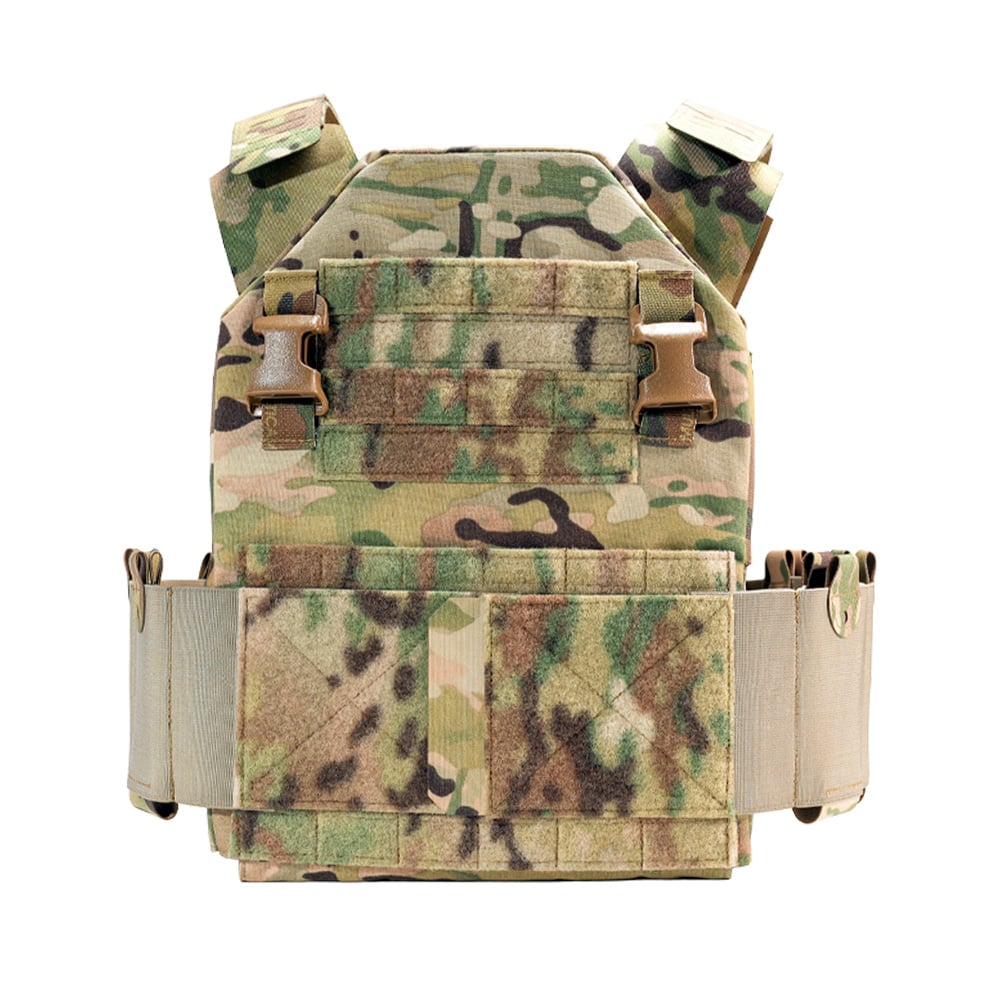
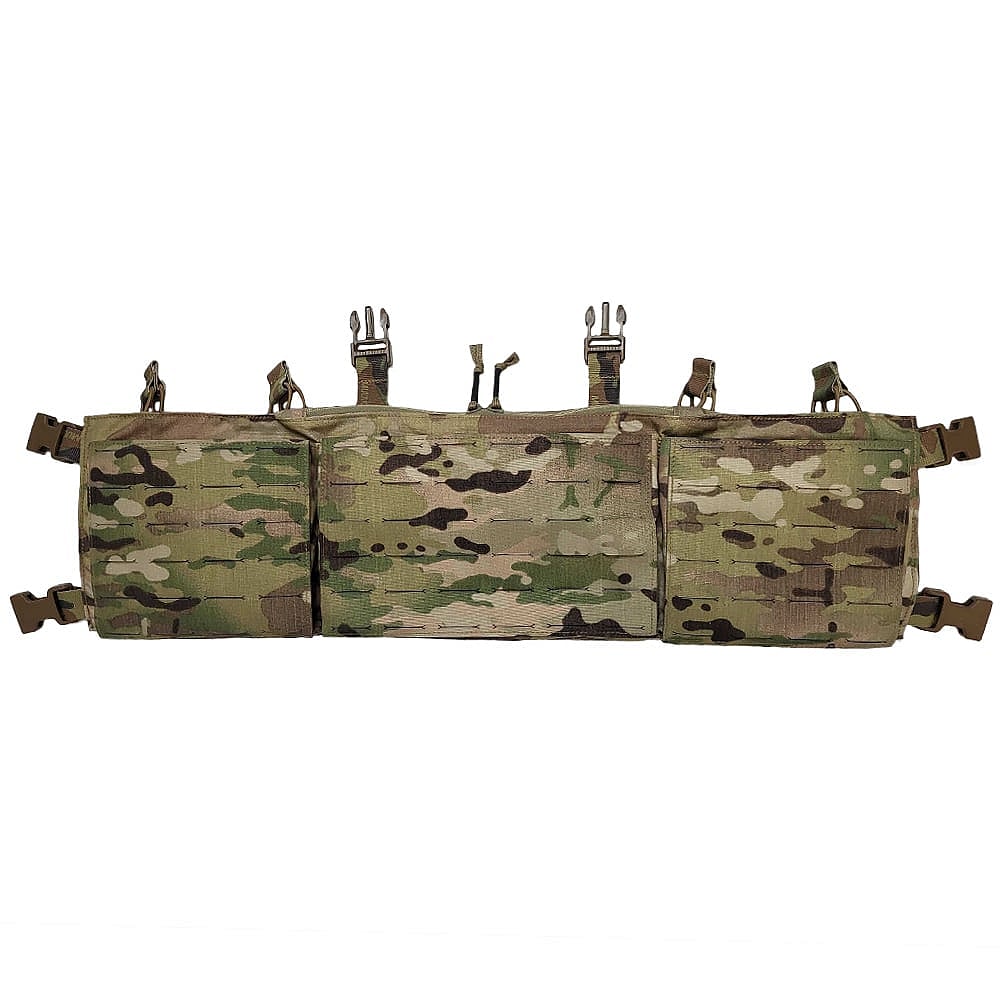
\r\nAnatomy of a Plate Carrier
Before we get into setup, a quick tour of the parts you are working with. Terms matter. If you are new, learning these names saves confusion later.
Front plate bag. The main pocket on the front of the carrier that holds your front hard armor plate. Usually constructed with a top flap or a zip entry. Sometimes has a secondary pocket behind the plate for a soft armor insert.
Back plate bag. Same as the front, but for the rear plate. The back plate bag often has an integrated drag handle sewn into the top.
Soft armor pocket. Usually located behind the hard plate pocket, holds a soft armor insert that provides IIIA protection behind or around the hard plate. Not every carrier has this, and some carriers treat it as optional.
Shoulder straps. Connect the front and back plate bags over your shoulders. Can be fixed length (attached via buckles or direct stitching) or adjustable (with webbing and ladder locks). Padding varies. Some shoulder straps are integrated into the plate bag itself, others are separate pieces.
Cummerbund. The band that wraps around your torso and connects the front and back plate bags at the sides. Elastic, hybrid (elastic center with solid ends), or fully rigid. This is the most overlooked piece on most carriers, and setup errors here cause the most problems.
Side plate pockets. Some cummerbunds include pockets for side plates, which cover the kidney and underarm areas. Side plates are optional on most setups but mandatory in certain military and LEO roles.
MOLLE/PALS grids. The one-inch webbing rows stitched in a 1.5-inch ladder pattern across the front, back, and sides. This is the attachment system. If you want the full breakdown of MOLLE and PALS, we have a dedicated guide for that.
Loop velcro fields. Hook-and-loop panels, usually on the front flap, the back flap, or both. Used for identifiers (medical, blood type, name tape), unit patches, or ID flags. Some carriers also use velcro-backed placards that can carry mag pouches.
Drag handle. Usually sewn into the top of the back plate bag. Critical piece of gear in a real medical emergency, often ignored in setup because it is passive. Check yours for stitching integrity before you need it.
Step 1: Choose the Right Size
Sizing is where most carrier purchases go wrong, and it happens before you even put the carrier on. Three measurements drive plate carrier fit: your plate size, your torso length, and your chest circumference.
Plate Size First
Start with plates, because the carrier has to accommodate the plates you actually own or plan to buy. The common sizes:
- SAPI Medium. 9.5 x 12.5 inches. The workhorse size for adult males of average build. Most civilian and LEO setups use this.
- SAPI Large. 10.125 x 13.25 inches. For taller or broader builds. Worth sizing up if you are 6-foot-plus and have the torso length to support it.
- SAPI Extra Large. 11 x 14 inches. Rare in civilian use, more common in military-issue loadouts.
- Shooter’s Cut / Swimmer’s Cut. Same nominal size as SAPI but with more aggressive shoulder and underarm cuts for improved mobility. Trade-off is slightly less surface area coverage. Preferred for active shooters and anyone who needs shoulder mobility.
- Female-specific plates. Shorter vertical dimension, often with chest contouring. Still not widely available but increasingly offered by manufacturers who actually fit women.
The plate you pick has to fit in the carrier’s plate bag. Most carriers list which plate sizes they accommodate. If yours does not, measure the plate bag interior and compare to your plate dimensions before buying.
Torso Length
Measure from the suprasternal notch (the soft dip at the base of your neck, between your collarbones) down to your navel. Add approximately two inches. This is the vertical span your plate carrier should cover.
Most adult males land between 16 and 19 inches. If your torso length is significantly longer or shorter than your plate height suggests, you are in custom territory or you need to consider a different plate size entirely.
Chest Circumference
Measure around the widest part of your chest, under your arms, with your shirt on (nothing bulky). This determines cummerbund length. Every carrier has a range it accommodates. Our carriers cover S, M, L, XL, and XXL in standard sizing, and we build custom for builds outside that curve.
When Standard Sizing Does Not Work
Standard plate carrier sizes are designed around an assumed adult male body curve. Broad-shouldered, narrow-waisted, tall, short, female, and every body type that does not sit on the mean ends up with fit compromises. If a plate carrier does not fit after adjustment and you are in one of those categories, custom is probably the right path. We build custom carriers regularly. It is not exotic.
Step 2: Set Plate Positioning
This is the single most important section in this guide. If you learn nothing else, learn plate positioning. Most of the carriers we see in the wild have the front plate set too low by two to three inches. That mistake costs lives.
Front Plate Position
The top edge of your front plate should sit at your suprasternal notch, the soft dip where your collarbones meet. Put your finger on that dip. That is where the top of your plate should land when you are standing upright.
Why? Because above the suprasternal notch, you are into the great vessels and the trachea, which armor cannot practically cover. Below it, you move into the chest cavity where your plate needs to be protecting the heart and the upper lung fields. If the plate sits at or just above the suprasternal notch, it covers the vital organs you can protect. If it sits two inches lower, the upper part of your heart and the great vessels above it are exposed.
Why do people get this wrong? Because a plate sitting at the correct height feels strange at first. It rides higher than you expect. When you tilt your head down, you feel the top edge of the plate against your chin. This is not a problem. You adjust. The alternative is to set the plate at a position that feels comfortable, which pushes the plate down into coverage territory that does not matter as much while exposing the upper chest that matters most.
Check this with the carrier on. Reach up and feel where the top edge of the plate is. If it is more than one finger-width below your suprasternal notch, raise it.
Back Plate Position
The back plate should mirror the front. Top edge roughly at T4 or T5 vertebrae, which corresponds to the spot directly behind the suprasternal notch. If the front is set correctly and the shoulder straps are symmetrical, the back plate should land in the right position automatically.
Check by having someone else look at the back of your carrier while you stand upright. The top edge should be level, neither riding up into the neck nor dropping below the shoulder blades.
If the back plate is too high it will push into your neck when you look up or when you are prone. If it is too low, your lower back is exposed and the carrier will tend to sag at the rear, pulling the front up off your body when you lean forward.
Side Plate Position
If you are running side plates, they should sit snugly in the cummerbund without gapping at the top or bottom. The side plate covers the kidney and the underarm vessels on either side. Vertically, they should align roughly with the lower half of the front plate.
Most side plates are smaller than front and back plates (6×8 inches is common) because they are protecting a smaller cross-section. Make sure your cummerbund is actually holding the side plate snug. Loose side plates rattle and slide, and a sliding plate is not providing reliable coverage.
Step 3: Adjust the Shoulder Straps
Shoulder straps carry the vertical load of your carrier. The goal is to get the carrier sitting on your torso, not hanging from your shoulders. Those are two different things.
A carrier that hangs from the shoulders puts all the downward load into your trapezius muscles. You feel this after 30 minutes as hot spots and a dull ache across your upper shoulders. A carrier that sits on the torso uses the cummerbund to bear the load, and the shoulder straps only keep the plates aligned vertically.
How to Adjust
Put the carrier on with plates in. Tighten the cummerbund to working tension (more on that in Step 4). Then adjust the shoulder straps so the plates sit in position and the straps are snug but not pulling down into your shoulders.
Too loose: the carrier flops when you move. Plates ride up and down when you run. The front plate can lift off your chest when you jump or go prone.
Too tight: the straps dig into your trapezius. Your arms feel restricted, especially when you reach overhead. Shoulder straps that are digging at rest will be unbearable after an hour of movement.
The sweet spot: you can slide two fingers between the shoulder strap and your shoulder without forcing it, but the strap is not lifting off your shoulder when you move.
Padding Decisions
Shoulder pads are useful in specific situations and unnecessary in others. If you are wearing the carrier for extended periods (over 2 hours), carrying heavy loads, or dealing with shoulder pressure from other gear like a pack, shoulder pads reduce fatigue meaningfully.
If your carrier is dialed in correctly and you are doing short-duration wear (home defense ready-up, range sessions, short patrol), shoulder pads are optional and can add unnecessary bulk.
Most of our carriers accept aftermarket shoulder pads without modification. Test before committing.
Step 4: Set Cummerbund Tension
The cummerbund is what holds the carrier to your body. It is not just a closure. It is a critical piece of load-bearing equipment and most people set it wrong.
The Flat Hand Test
Stand upright with the carrier on and plates in. Slide a flat hand (palm flat, fingers together) between your stomach and the front of the carrier. You should be able to fit the flat hand in with moderate resistance, but not be able to make a fist between your body and the carrier.
Too loose: you can fit a fist. The carrier will rotate on your torso when you twist. Side plates will gap. Soft armor will bunch. The front plate will swing forward when you lean forward. This is the most common setup error on elastic cummerbunds.
Too tight: you cannot slide a flat hand in without forcing it. Your breathing is restricted, especially when you exert yourself. Your ribs will hurt after 30 minutes. On hybrid or rigid cummerbunds, too-tight tension cuts into your lower ribs and obliques.
Even Front-to-Back Tension
Cummerbund tension should be symmetrical. If the right side is tighter than the left, the carrier will pull off-center and your plates will not sit square. Check by having someone look at you from directly in front and from behind. The carrier should be centered.
Some cummerbunds adjust at both ends, some only at one. Know which you have. If yours adjusts only at one end, you set tension by how much webbing you pull through at that single point. Mark the working length once you have it dialed, so you can repeat it.
The Cummerbund Gap Problem
Here is something most plate carrier companies do not talk about. Even a well-adjusted cummerbund often leaves exposed gaps at the sides of the torso, between the edge of the front plate bag and the edge of the back plate bag. If you are running soft armor inside the cummerbund, the soft armor often does not fully cover this gap either.
This is a real coverage problem. The side torso contains the kidneys, liver, spleen, and major vessels. Those are organs you want protected. Standard cummerbund soft armor panels are usually cut to a single standard size that does not fill the gap on all carriers.
For our Sentry and Lancer carriers we offer pre-sized cummerbund side armor panels (see the Sentry set and Lancer set) that close this gap directly. For other carrier brands, we build custom cummerbund panels sized to eliminate the gap on whatever carrier you own. If you have never checked your cummerbund for this gap, do it now. Most people are surprised.
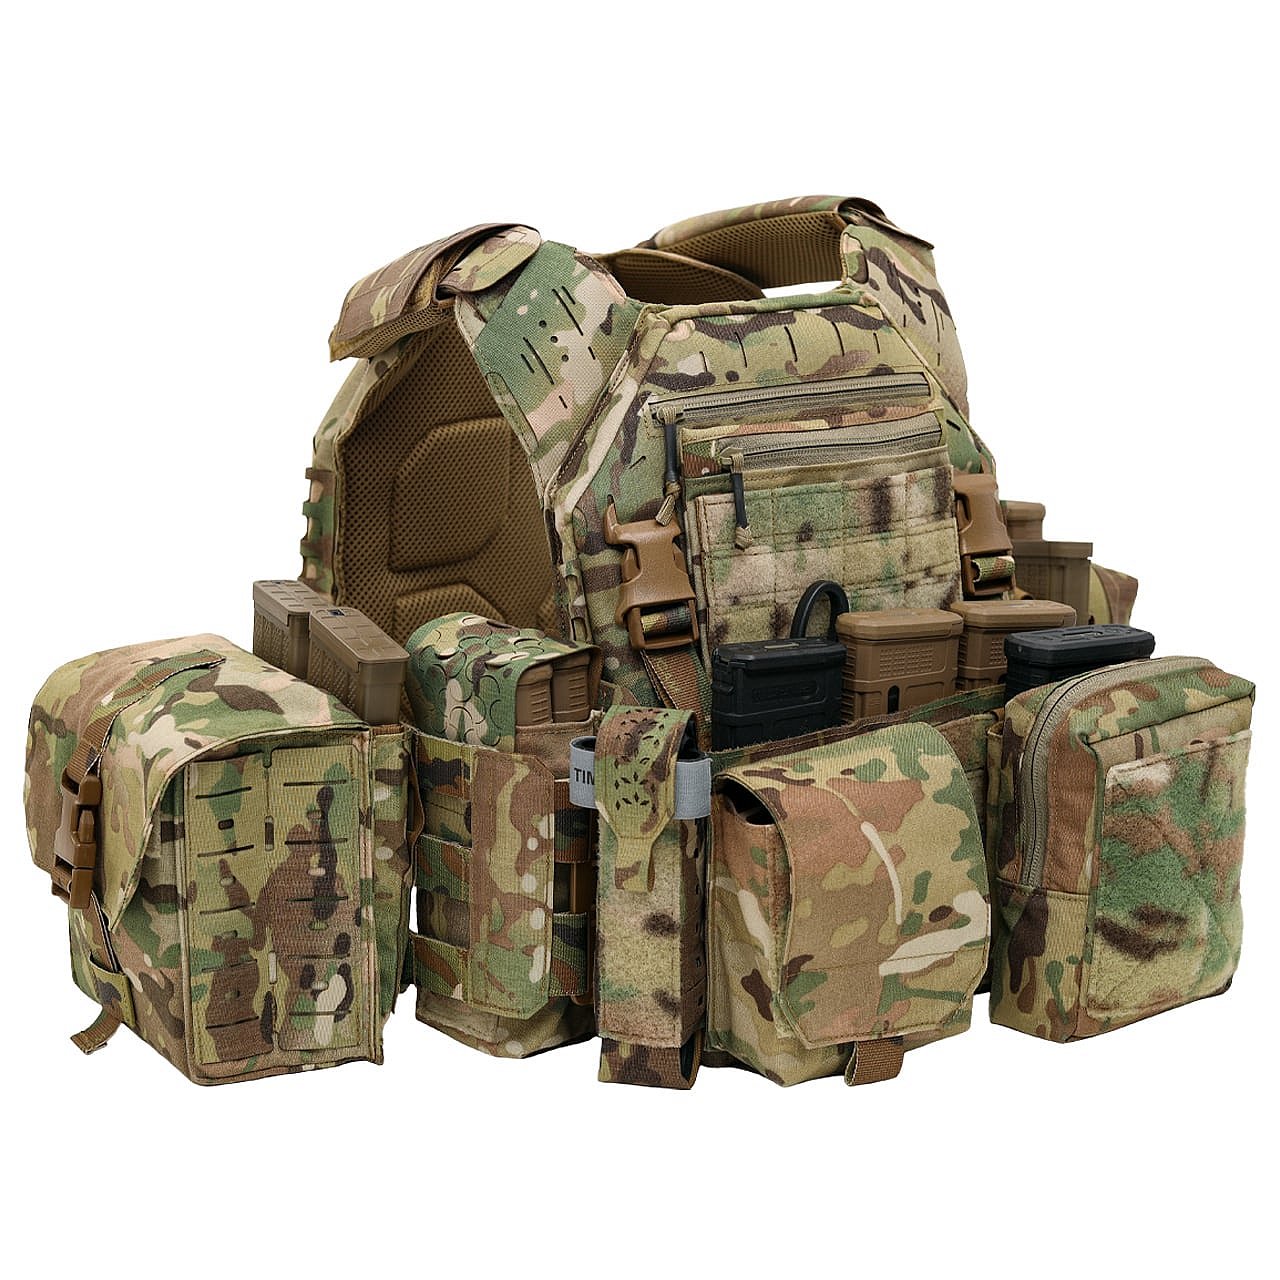
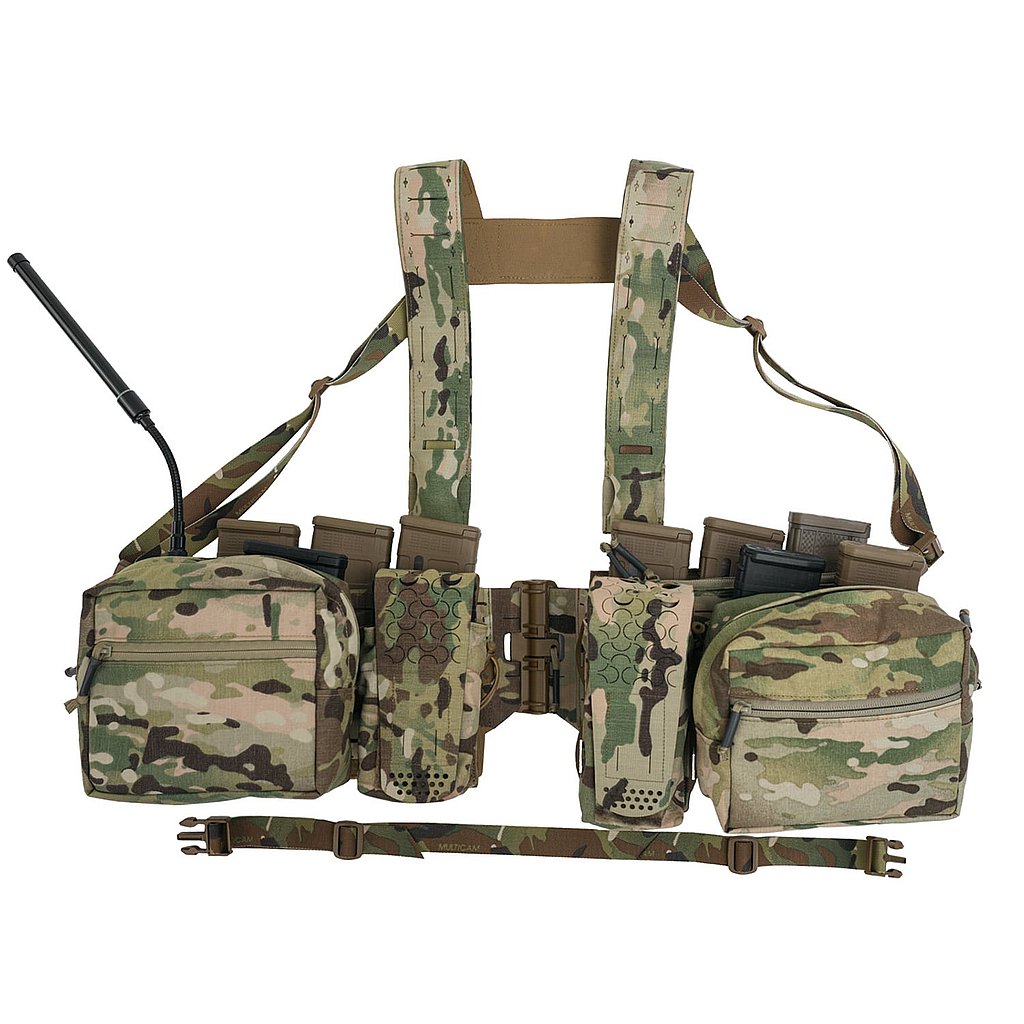
Step 5: Plan Your MOLLE Layout
Now you have a carrier that fits. Time to load it. MOLLE layout is strategy, not decoration. Three principles drive every good layout.
Accessibility tier. Items you need fastest go closest to your dominant hand and in predictable positions. Items you need less often go in less accessible spots. Items you need rarely but critically (like a tourniquet) go in a standardized location so anyone trained can find them on your body.
Weight balance. The left side and right side of your carrier should carry approximately equal weight. Put too much on one side and you will fatigue asymmetrically and your stance will drift off-center under load. Distribute heavy items (like fully loaded mags) across both sides of the front panel, not just one.
Predictability. Your layout should be muscle memory. In a high-stress moment, you should be able to reach for any piece of gear without looking. This means fixed positions for fixed items. The same things always go in the same places.
Front Panel Layout
The front panel is prime real estate. Heavy-use items only.
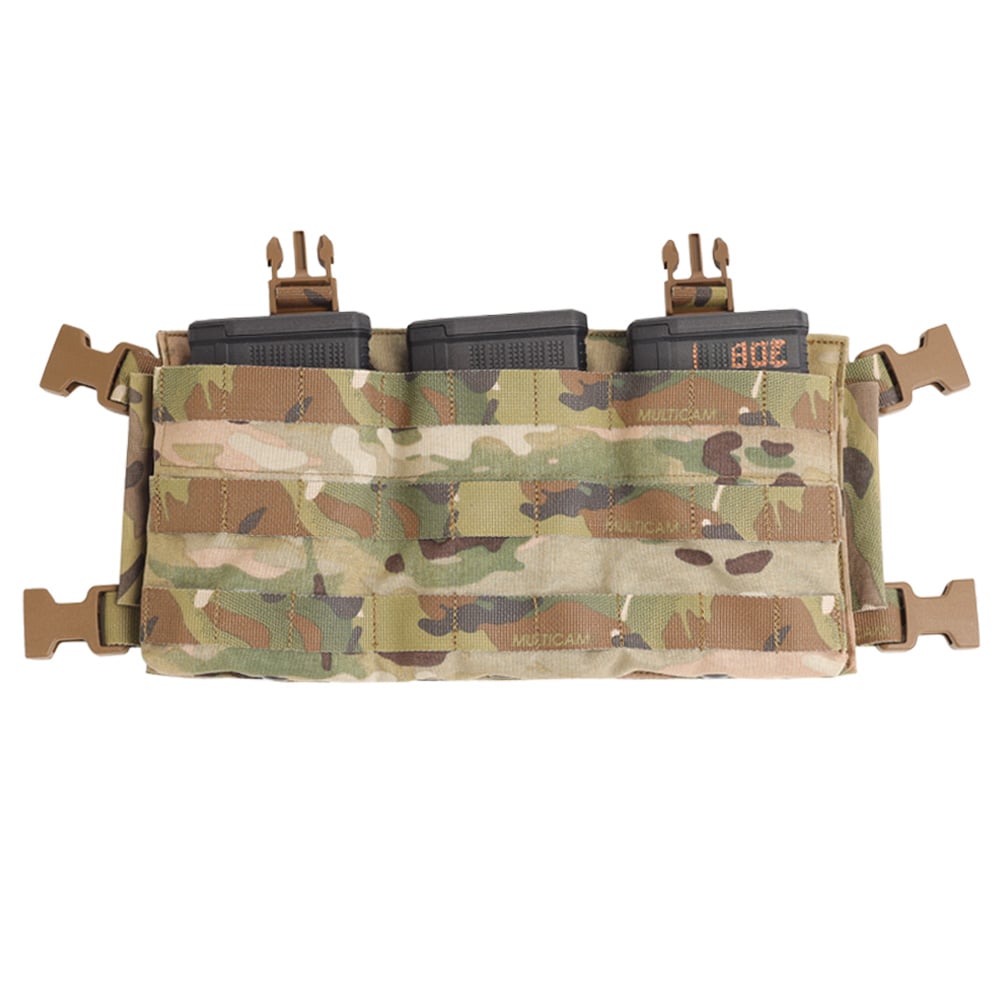
- Magazines: center, 2 to 3 pouches. Load out with the number of mags your mission or policy requires, typically 2 for civilian, 3 for duty. Orient bullets-down for most standard mag pouches. Your support hand reaches across the body to retrieve them.
- Admin pouch: upper right (for right-handed shooters). This holds ID, small notes, a pen, keys, earplugs, anything you access with your support hand without a time constraint.
- Light or tool: where your support hand can grab it without crossing the body. Some people run a dedicated light pocket on the front, some prefer it on the cummerbund.
- Placards or flap patches: the top of the front panel. Medical identifier, blood type, ID flag. Low priority for grabbable access, high priority for visibility.
Common front panel mistake: loading every inch of MOLLE real estate with accessories you think you might need. This adds weight you will carry all day for gear you might use once. The better rule: if you have not used it in the last two range sessions or training exercises, it does not belong on the carrier.
Back Panel Layout
The back panel is for items someone else needs to reach on your body, and for bulk items you do not need to grab yourself.
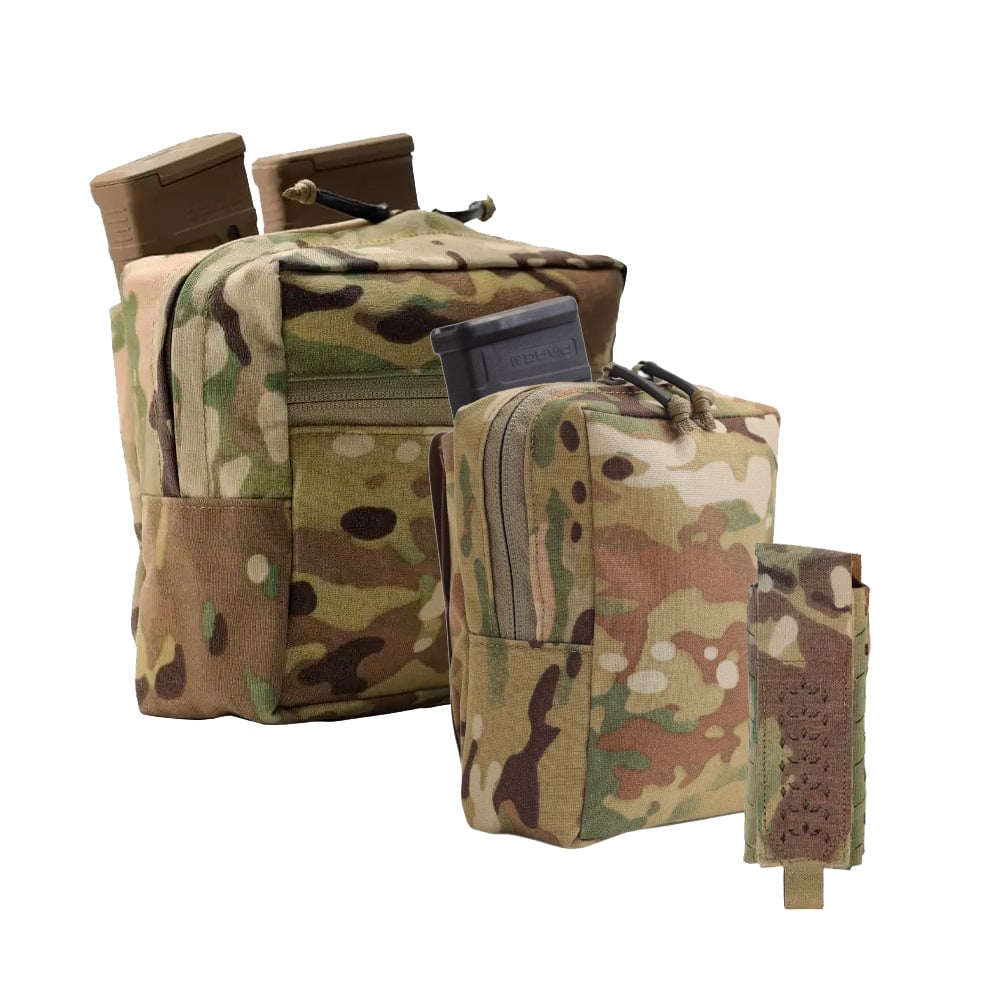
- Medical access kit (MARK): high center back, with a pull-tab. Standard across military, LEO, and tactical civilian communities. This is where trauma aid lives. If you go down, the person working on you reaches for the back of your carrier and pulls. Standardization matters here. Your placement should match the convention your partners train on.
- Hydration bladder: center back, full width. If you run water, this is where it goes. Integrated hydration carriers attach with MOLLE or clip-in systems.
- Document pouch or folded map: lower center or on a rear placard. Paperwork, mission notes, anything you do not need to touch during an active encounter.
The back panel is passive real estate. Do not clutter it with small items that will never be accessed. Keep it purposeful.
Side Panels (Cummerbund)
The cummerbund surfaces are great for items you need to reach with either hand, without crossing your body.
- Radio pouch: non-dominant side. Right-handed shooters run the radio on the left hip area of the cummerbund. Your non-dominant hand operates the PTT or volume, keeping your dominant hand on your weapon.
- Knife or tool: dominant side. Quick access for cutting a seatbelt, webbing, or working a mechanism.
- Secondary magazines: on the cummerbund if your front panel is full. This is where your third and fourth mags go when you need that many.
- Dump pouch: rear or non-dominant side. For empty mags, casings, or items you grab and stash fast.
Do not over-load the cummerbund. The cummerbund is also what holds the carrier to your body, and every pouch on it adds weight that has to be supported by the elastic or hybrid material. Too much weight on the cummerbund causes it to sag and the carrier to shift.
Step 6: Prioritize Accessories
What actually goes on the carrier, versus what people think should. Organized by priority tier.
Tier 1: Everyone Carries These
Individual First Aid Kit (IFAK). At minimum: one tourniquet (CAT or SOFTT-W), one pressure bandage (Israeli or OLAES), two chest seals (Hyfin or equivalent), one pair of nitrile gloves. This is the bare minimum trauma kit for a gunshot wound or major bleeding injury. Place on the back panel with a pull-tab so a partner can access it. Some people also run a front-panel IFAK for self-aid. Both approaches have merit.
Admin pouch. ID, keys, a pen, a small notepad, a spare set of batteries. Low drama but essential for any extended wear.
Water. Either a hydration bladder on the back panel or a canteen pouch if you prefer. Any wear longer than 45 minutes needs water access.
Tier 2: Mission-Dependent
Additional magazines. Number depends on role. Most civilian defensive setups run two mags beyond the one in the weapon. LEO patrol typically runs three. Special-duty roles run four to six. More is not always better. Additional mags mean additional weight, and weight multiplies over time.
Radio. Only if you are actually running comms. Civilian setups rarely need this. LEO and tactical teams almost always do.
Light. Weapon-mounted is usually better than body-mounted, but a secondary pocket light for inspection work is valuable. Small LED lights clip to MOLLE cleanly.
Tools. A fixed blade or folder, a multi-tool, and a small pry tool cover most field tasks. Do not overload with redundant tools.
Tier 3: Specialized
These only go on the carrier if your mission specifically calls for them: breaching tools, advanced medical (needle decompression kits, burn kits, splints), specialty comms, night vision tethers, hearing protection holders, specialized ID or credentials. If you are not sure whether you need it, you probably do not.
The accessory trap is thinking that more gear equals more capability. More gear equals more weight, more fatigue, more snag points, and slower transitions between tasks. Strip your loadout down to what you actually use. Your carrier should feel light for what it contains, not heavy.
Setting Up for Different Mission Profiles
The same carrier can be set up in different configurations depending on use. Here are four common profiles.
Home Defense
Priorities: fast donning, light weight, minimal loadout. You will likely be wearing this over pajamas at 2am with adrenaline making your hands clumsy. Simpler is better.
- Plates and soft armor in place
- One IFAK on the back panel
- One mag pouch (with a loaded mag) on the front
- A light in an accessible pocket
- Admin pouch with house keys and phone charger cable
Skip the extra mags, the radio, the dump pouch. Keep it to what you need in a house-clearing or barricade scenario. Total loaded weight: around 15 to 20 lbs with plates.
Range and Training
Train with the loadout you plan to carry. If your operational setup is three mags, train with three mags. If you run a radio, train with a radio. The carrier you learn in becomes the carrier you fight in.
One useful variation: train at least occasionally with a heavier loadout than your normal setup. If your operational carrier runs 20 lbs, spend a training session at 28 lbs. You will feel what fatigue does to your shot placement and your movement, and your baseline loadout will feel light by comparison.
LEO Patrol
Typical setup for an external-carrier patrol officer:
- Plates and soft armor (usually IIIA soft with ICW hard plates for rifle response)
- Three rifle mags on the front
- IFAK on the back, standardized with your unit’s convention
- Radio on the non-dominant side of the cummerbund
- Cuffs, OC spray, and admin items on the cummerbund or duty belt depending on department setup
- Shoulder pads for all-shift wear
Check your department’s load-out regulations. Some agencies have specific requirements about identifier visibility, tourniquet placement, and unit patches.
Military and Tactical
Military loadouts vary widely by role, and this section cannot cover them all. The principles still apply: balance, predictability, mission-specific accessory choices, and proven placement for anything another team member might need to access on your body.
If you are in a unit, your SOP drives your setup more than this guide does. If you are a contractor or building a civilian setup inspired by military gear, apply the same discipline: only gear that earns its place.
Break-In and Fit Testing
You have sized your carrier, set plate position, tuned shoulder straps and cummerbund, and loaded your MOLLE layout. Now do not take it out in the field yet. Break it in first.
Phase 1: Empty Wear (30 to 60 minutes)
Put the carrier on without plates and wear it around the house. Walk, sit, stand, bend over, reach overhead. Feel for any immediate pressure points, chafing spots, or things that poke.
Common empty-wear issues: cummerbund ends catching on clothing, shoulder strap rub points, velcro peeling off the carrier and onto your shirt.
Phase 2: Plates Only (1 to 2 hours)
Load plates into the carrier and wear it for 1 to 2 hours, moving around normally. No MOLLE gear yet, just the carrier and plates. You are testing how the plates sit and whether the shoulder strap and cummerbund adjustments hold up under load.
Watch for: plates shifting from their set position, cummerbund loosening over time, any hot spots that develop with weight that did not appear in empty wear.
Phase 3: Full Loadout (2 to 4 hours)
Now add your planned MOLLE gear and wear the full loadout for an extended session. If you can, do this during a range session or a training day. Real movement under load reveals fit problems that static wear will not.
Adjust anything that is not right. It is much easier to retune your setup during break-in than to discover problems in the field.
The 15-Minute Rule
If something on your carrier hurts at 15 minutes of wear, it will not get better at 2 hours. It will get worse. Hot spots, pressure points, and chafing get magnified by time, sweat, and movement. Fix them now.
Our standard plate carriers and soft armor come with a 15-day fit test window. If the fit is not right after you have broken it in properly and adjusted it, you can exchange it for a different size or configuration within 15 days. This policy exists because fit is real and not every body matches standard sizing on the first try.
Common Setup Mistakes
Read this section even if you think you have your setup dialed. Most of these mistakes are invisible to the person making them until someone else points them out.
Mistake 1: Plate Set Too Low
The single most common setup error. People set the plate where it feels comfortable, which is usually 2 to 3 inches below where it should be. Result: exposed upper chest, exposed great vessels, exposed heart. Review Step 2. Set the top edge of the front plate at your suprasternal notch, not below it.
Mistake 2: Front-Heavy Loadout
Three mags, admin pouch, IFAK, light, and a radio all on the front panel with an empty back panel. The carrier rocks forward when you move. The cummerbund sags at the rear. You fatigue unevenly. Move weight to the back panel. Hydration alone on the back will rebalance most front-heavy setups.
Mistake 3: Cummerbund Too Loose
Often combined with Mistake 1. A loose cummerbund lets the plate sag forward and down, which feels comfortable but exposes you. It also lets the carrier rotate on your torso when you twist, throwing off coverage during any fast movement. Apply the flat hand test. If you can make a fist between your body and the carrier, tighten it.
Mistake 4: Ignoring the Back Panel
The back panel is just as important as the front, not just for weight balance but for medical access. If you go down and a teammate or responder has to work on you, they will reach for the back of your carrier. If your MARK is not there, or not in the standardized position, they are wasting time looking. Set the back panel with the same care as the front.
Mistake 5: Mismatched Armor and Carrier
Running soft armor from one brand inside a carrier from a different brand. The soft armor does not fit the pocket correctly. It bunches, gaps, or sits wrong. This is one of the most common reasons we build custom soft armor. If your soft armor does not fit your carrier correctly, you have two options: exchange it for a matched set, or have custom panels built for your specific carrier. Running mismatched gear because it “mostly fits” creates coverage gaps you cannot see.
Mistake 6: Skipping Break-In
Buying a carrier, loading it up, and wearing it for the first time at a training day. Every fit problem you have shows up at the worst possible moment. Break in every carrier before you depend on it.
Mistake 7: Gear Creep
Every few months, adding one more pouch, one more accessory, one more tool, until the carrier has become a sum of bolted-on extras rather than a deliberately configured system. Twice a year, strip everything off and reload only what you have used in the last 90 days. Everything else comes off.
Maintenance and Inspection
A plate carrier is a piece of safety equipment. Treat it like one. A basic inspection routine extends the working life of your gear and catches problems before they become failures.
Weekly Visual Check
Look at high-wear points. Shoulder strap stitching. Cummerbund attachment points. The drag handle. Any visible wear in the Cordura or nylon outer shell. MOLLE webbing that is fraying. Velcro that has lost its grip. Zippers that are starting to stick.
Fixing small issues early is cheap. Ignoring them until a strap fails under load is expensive in ways you do not want to discover.
Monthly Cleaning
Wipe down the carrier with a damp cloth and mild soap. Pay attention to areas that collect sweat: the shoulder strap padding, the inside of the cummerbund, and anywhere the carrier rests against your body. Let it air dry completely before storing. Do not put it in a dryer. Heat damages the webbing and the velcro.
Soft armor inserts should be pulled out for cleaning every few months, wiped down, and reinserted. Do not machine-wash soft armor. The agitation and heat can damage the ballistic material.
Quarterly Deep Inspection
Pull plates and soft armor out. Inspect the plate pocket interior for wear. Check the soft armor for delamination, unusual stiffness changes, or visible damage to the cover. Re-seat everything and confirm nothing is damaged.
Also a good time to re-evaluate your loadout. Has it drifted from what you actually use? Strip and reload.
When to Replace
Hard plates: 5 to 10 years depending on composition. Steel lasts longer than polyethylene in storage but is heavier and has spalling concerns. Ceramic plates are the most sensitive to drops and impacts, and should be inspected after any significant impact. Check manufacturer guidance for your specific plates.
Soft armor: Typically 5 to 7 years from manufacture date, printed on the label. Aramid-based soft armor (Kevlar, Twaron) can degrade faster if exposed to UV, moisture, or extreme heat. Store in a cool, dry place out of direct sunlight.
Carriers: No hard expiration. Inspect regularly and replace when you see structural wear. A carrier that has lived a hard life for a decade may need retirement. A lightly-used carrier can last much longer.
Warning signs that demand immediate replacement: delamination (soft armor layers separating), visible damage to the ballistic material cover, webbing that is fraying through, structural failure at stitch lines, significant stiffness change in soft armor (old aramid becomes stiff and brittle), or any impact damage to hard plates including cracks, dents, or ceramic fracture lines.
The Setup You Build Is the Setup You Fight In
Fit, positioning, load balance, MOLLE layout, break-in, and maintenance. Every one of these steps takes time up front and saves time downstream when it matters. A plate carrier set up with care becomes invisible. You stop thinking about the gear and start thinking about the task in front of you. That is the goal.
If you are setting up a new plate carrier and want help working through the fit, text us at 865.859.9850 or email support@midwestarmor.com. We build this gear in Knoxville and we are happy to walk through sizing, configuration, or custom options if standard sizing does not work for your build.
For the complete pillar reference on choosing and configuring carriers across every cut and use case, see our Plate Carriers Guide. If you are still figuring out the rest of your armor system, read our Body Armor Guide for threat levels and armor selection, or our Complete MOLLE and PALS Guide for everything on the attachment system you will use to load up the carrier you just set up.
FAQ
A typical civilian or LEO setup with plates, soft armor, 3 mags, an IFAK, a radio, and a few accessories runs 22 to 28 pounds. A minimal home defense setup with plates and a couple of accessories is 15 to 20 pounds. Military and tactical loadouts can easily hit 35 pounds or more. The lighter your plates (polyethylene vs steel), the more budget you have for accessories.
Depends on your threat and your role. Military and some LEO roles require side plates. Most civilian defensive setups skip them because the kidney and underarm areas are less commonly struck in defensive scenarios, and side plates add meaningful weight. A good middle ground is running a IIIA soft armor cummerbund without hard side plates, which adds handgun protection to those areas without the weight penalty.
Yes. A moisture-wicking undershirt reduces chafing, absorbs sweat, and extends the life of your carrier by keeping salt and moisture off the interior surfaces. Cotton is acceptable but holds moisture; synthetic athletic material performs better. Avoid wearing the carrier directly against skin for anything longer than a ready-up.
Steel plates are durable but watch for surface rust, coating damage, or any impact deformation. Ceramic plates can crack from impacts including being dropped; X-ray inspection is the most reliable test but is rarely available. Polyethylene plates are sensitive to heat (never leave them in a car in summer) and have a manufacturer-specified lifespan. When in doubt, contact the manufacturer or replace.
Yes, and many LEO patrol setups do. The carrier rides above the belt, and the cummerbund sits on the natural waist. Load your carrier with rifle mags and your belt with pistol mags, cuffs, and handgun accessories, so they do not compete for space. Make sure the carrier does not block access to your duty belt items.
Usually one of two things. Cummerbund is too loose, so the carrier lifts off your torso when you move. Or the shoulder straps are set too short, which pulls the carrier up. Check the cummerbund first. Flat hand test. If the cummerbund is right and it still rides up, lengthen the shoulder straps slightly.
Most common cause: you gained or lost weight, or you switched what you wear underneath. A change of even 10 pounds changes your circumference and cummerbund fit. Adjust cummerbund tension first. If the straps still feel off, recheck plate position. If you switched from a summer T-shirt to a winter base layer, you may need more cummerbund length to accommodate the bulk.
Yes, but the weight and feel will be different. For dry practice and skill drills, running empty is fine. For anything involving movement and mag changes, run it loaded with either your actual plates or training weights equivalent to your plates. Your body learns different mechanics under load, and skipping the weight in training means you will move differently in real conditions.
Plate carriers are designed around the hard and soft armor system, with plate pockets as the central feature. Tactical vests may or may not have armor capacity; many are just load-bearing vests without ballistic protection. Modern terminology sometimes uses “tactical vest” loosely, so read the product description carefully. If it does not have dedicated hard plate pockets sized for SAPI or equivalent, it is not really a plate carrier.
Yes. If you have non-standard body proportions, unusual plate sizes, or specific mission requirements that standard carriers do not cover, we design and manufacture custom carriers to spec. Contact us at support@midwestarmor.com or text 865.859.9850 to start the conversation.
Custom Soft Armor: How to Get Inserts That Actually Fit Your Carrier
Most soft armor doesn't fit the carrier you actually own. Here's how our Custom Soft Armor program solves the fit problem and when to choose custom…
Layering a Chest Rig Over a Plate Carrier: When and How
Layering a chest rig over a plate carrier gives you ballistic protection plus high-capacity gear carriage. The SRV Split Chest Rig is purpose-built for this layered…
Best Chest Rig: How to Pick the Right Rig for Your Role
The best chest rig is the one that matches your role, mag count, and platform. Here is how to pick between continuous, modular, split, and minimalist…